Documentation Index
Alphabetic Index

XRPi Documentation - Installation
Installing / Upgrading XRPi
| Prev: Introduction | Next: Sysop Interface |
- Obtaining XRPi
- New Installation
- Upgrading from an earlier version
- Moving XRPi to another location
- Uninstalling XRPi
1. Obtaining XRPi
First of all, obtain the latest full version from the downloads page of this site.
This is the only OFFICIAL source of XRPi. If you find it on any other site, don't trust it!
Unfortunately XRPi is not yet available from any Linux repository.
2. New Installation
There is no installer program at present, but if you can't install XRPi manually, we respectfully suggest you don't have the required skills to use it!
You can install and run XRPi anywhere you like, even on a USB stick. The choice of where to install it is completely up to you. If you change your mind, you can easily move it.
The installation process does not make any changes to your Raspberry Pi configuration.
2.a. XRPi "Root" Directory
All files and directories required by XRPi are located within a single directory, termed its "root" or "working" directory.
The name of this directory is not important, nor its its location.
All other directories used by XRPi are sub-directories of the XRPi "root" directory. See below for more details.
2.b. Installing The Files
"Installation" is simply a matter of copying files from the downloaded archive into your chosen "root" directory.
Exactly how you do this depends on whether you are using CLI or desktop, and which file and archive managers you use. So we can only give you a rough guide.
Assuming you are using the Raspberry Pi desktop, locate the downloaded .zip archive and click it. The archiver window should open, showing the files in the archive.
Click Action->Extract, or click on the "Extract Files" icon. Enter a temporary destination directory in the "Extract to:" box.
Select the "All files" and "Extract files with full path" options, then click the "Extract" button.
If using a file manager, navigate to the temporary directory, then drag the "xrouter" directory to your chosen position. Rename the "xrouter" directory if you wish.
Alternatively, use the mv command in a terminal to move and rename the directory, e.g.
sudo mv /home/pi/tmp/xrouter /home/pi/packet/xrpi
The XRPi "root" directory should now have the tree structure shown below. Note some of the directories (e.g. LOG and CHAT) won't be created until XRPi runs. All directory names must be UPPER CASE.
2.c. XRPi Directory Tree
          /             - XRPi "root", e.g. /home/pi/xrouter
          /CHAT/        - Chat server data files
          /FINGER/      - FINGER files
          /HELP         - HELP files
          /HELP/AMSG/   - Help for APRS messaging
          /HELP/CHAT/   - Help for chat server
          /HELP/FTP/    - Help for FTP server
          /HTTP/        - Root for HTTP server (see below)
          /INFO/        - INFO files
          /LOG/         - Activity log files
          /MAN/         - Sysop manual files
          /MISC/        - Miscellaneous files (see below)
          /PMS/         - Personal Message System data files
The HTTP directory is the only directory that may be relocated (using the HTTPROOT= keyword in XROUTER.CFG). This allows the HTML files to be located somewhere more convenient, e.g. an external drive.
The MISC directory is not used by XRPi. It contains assorted optional files which you may find useful.
2.d. Files in XRPi "root" Directory (* = mandatory)
*.SCR Dialler scripts. ACCESS.SYS TCP/IP access control. BOOTCMDS.SYS Boot up config commands. CRONTAB.SYS Event control. DOMAIN.SYS TCP/IP hostname resolution. DYNDNS.CFG Dynamic DNS Configuration. ENCAP.TXT IPENCAP routes. EXEC.HTM Command template for HTTP server HTTP.ACL HTTP Proxy Egress Control. HTTP.SYS HTTP Rewrite / Proxy Control. HTTPBAN.SYS HTTP URL block list. IGATE.CFG APRS IGATE configuration. IPROUTE.SYS IP routes / configuration. PASSWORD.SYS Sysop passwords. PPPHOST.n PPP configuration files. PPPLOG.TXT PPP activity log. SOCKS.ACL SOCKS proxy egress control. TELGUEST.ACL Telnet "guest" mode egress control. TELPROXY.ACL Telnet proxy egress control. TELPROXY.MSG Telnet proxy welcome message. USERPASS.SYS User passwords. XENCAP.TXT Amprnet Encapsulated Routing File. xrpi (*) XRPi executable program. XRNODES NetRom nodes / routes recovery file. XROUTER.CFG (*) XRPi Main Configuration File.
The working directory should contain at least "xrpi" and XROUTER.CFG. All other files are optional and the system will run without them, albeit in a resricted mode.
2.e. Initial Testing
XRPi is supplied with a dummy configuration (XROUTER.CFG) which should allow you to start it up and get the feel of it.
But first you will need to make the "xrpi" file executable. Open a terminal window, navigate to the directory containing XRPi and use the chmod command as follows:
chmod +x xrpi
Ensure your terminal window is at least 80 characters wide by 25 rows, and adjust as necessary. Then start the program as follows:
./xrpi
If all goes well, the program will start, and you should see a display like this...
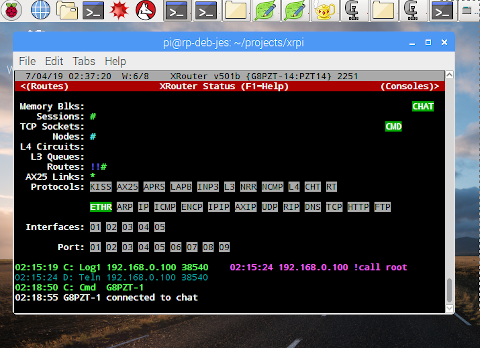
XRPi's display height depends on the size of the terminal window it is started in. It needs to be at least 25 lines, otherwise some of the panels may overlap. The display colors can be changed later.
If the program didn't start, there is a configuration error or a conflict for resources. This really shouldn't happen with the dummy config, but if it does there may be some clues in the text on screen, or in LOG/BOOTLOG.TXT.
Next: Overview of the Sysop Interface
3. Upgrading XRPi
If you are upgrading from an earlier version, you are strongly advised to download and apply the upgrades in strict sequence.
It MAY be possible to jump several versions in one go, but you must first check the intermediate versions in case there were any new config files, options or manual files etc.
The upgrade archive will usually contain a new executable, plus a text file explaining what has changed, and what modifications (if any) are needed to your configuration files. It may also contain new or updated manual files if required. Always read the text file!
It is recommended that you first backup or rename your existing exeutable, so that you can restore the original if the new version fails to run properly. If you have to modify any configuration files, it may be wise to back them up first.
For example, if you are currently running v501b, and the upgrade to v502 requires modification to XROUTER.CFG, first rename the existing executable to xrpi501b and copy XROUTER.CFG to XR501B.CFG. This makes it obvious which config file goes with which executable. Edit XROUTER.CFG according to the instructions provided.
Copy the files from the archive to the relevant directories within your XRPi installation. The upgrades will never contain files that could overwrite your existing .CFG or .SYS files, so it is safe simply to unzip the archive into the XRPi directory, in the same manner as for a new install. Allow the extractor to overwrite old .HLP and .MAN files with new versions.
If you are not running XRPi as root, don't forget to use the setcap command to set the new xrpi file's capabilities if required.
Finally, use "chmod +x xrpi" to make it executable, then restart xrpi.
WARNING: If you replace the "xrpi" file while the program is running, you MUST remember to chmod the new file before using the RESTART command, otherwise the command is refused.
4. Moving XRPi
To move your XRPi installation to another location in the directory tree, simply drag the directory containing XRPi.EXE and its subdirectories to its new home.
Don't forget to change any shortcuts or startup entries which point to the old directory.
5. Uninstalling XRPi
To remove XRPi from your machine, just delete the folder containing it. If you installed any shortcuts or startup entries, remove those also.
| Prev: Introduction | Next: Sysop Interface |