Documentation Index
Alphabetic Index

XRPi Documentation - Operation
Consoles
Introduction
In this context consoles are XRPi windows which allow the sysop to interact with XRPi, for example to trace traffic, or make connections. Each console is fully independent, and you may have up to 5 of them.
Console Layout
The console display starts on the line below the grey XRPi status/menu bar. Each console has the following format:
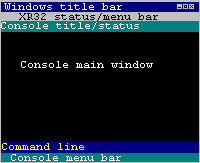
There is a single-line "status bar" at the top and a single-line "menu bar" at the bottom (these are shown in cyan).
Immediately above the menu bar is a single "command entry" line. The remaining central section is where monitored and received information is displayed, and this section is ANSI colour compatible.
The console status bar shows the console number, the console callsign, the version number, and the connection state of that console. The bottom "menu bar" displays a context-sensitive menu for that console.
The text and background colours of the various sections are fully configurable. The default settings were chosen to be ergonomic, but may not be to your taste, and can therefore be overridden by entries in the global section of XROUTER.CFG. The defaults can be further modified for individual consoles by adding console definition blocks.
You may specify a different callsign for each console (used when making outgoing connections), or use the same callsign for each one.
For details of how to configure the various console colours etc. see the console configuration page.
Console Keys
The following "special" keys are available when a console is displayed:
      <F1>                Display console help window.
      <F2>                Toggle monitoring on/off (MON).
      <F3>                Select port(s) to monitor. (MPORT)
      <F4>                Select monitored protocols. (MMASK)
      <F5>                Toggle disk capture on/off.
      <ESC>               Cancel operation / Disconnect.
      L/R arrow           Select previous / next console.
      U/D arrow           Scroll back/forward by one line.
      <PgUp>/<PgDn>       Scroll back/forward by one page.
      <End>               End scrollback.
      <Ctrl-LeftArrow>    Previous command in history.
      <Ctrl-rightArrow>   Next command in history.
      <Alt>               Open XRPi menu.
      <Alt-C>             Clear screen.
      <Alt-X>             Exit program.
<F1> - Help
Pressing <F1> pops up a window with the above information on it. The <ESC> key closes that window when you've finished with it.
 The contents of the help window are context-sensitive, i.e. they vary according to what you were doing when you pressed the <F1> key.
The example on the right shows the help window which pops up if the F1 key is pressed whilst in MMASK selection mode...
<F2> - MON - Monitoring
The <F2> key provides a quick way to toggle monitoring (protocol tracing) on and off, and is a shortcut for the MON ON|OFF commands.
<F3> - MPORT - "Monitor port"
The F3 key selects the port(s) to be monitored (traced), and is a shortcut for the MPORT command.
Upon pressing this key you are invited to enter a number or string of numbers representing the combination of ports to monitor. If you press <F1> at this point a pop-up help window will show you the following information:
To select port(s) to monitor, add together the following hex values:
        Port HEX    Port HEX     Port HEX     Port HEX
        ------------------------------------------------------
         0    1      8   100     16  10000    24   1000000
         1    2      9   200     17  20000    25   2000000
         2    4     10   400     18  40000    26   4000000
         3    8     11   800     19  80000    27   8000000
         4   10     12  1000     20 100000    28  10000000
         5   20     13  2000     21 200000    29  20000000
         6   40     14  4000     22 400000    30  40000000
         7   80     15  8000     23 800000    31  80000000

	e.g. #12 will monitor ports 4 and 1.
Alternatively you may enter a single decimal port number, or a combination of ports separated by "+" e.g. "1+5+23".
You may cancel the operation by pressing the <ESC> KEY.
<F4> - Monitor Mask
The <F4> key invites you to enter the "monitor mask" (aka trace mask), i.e. the protocols you wish to monitor. Pressing <F1> at this point pops up a help window with the following information:
         0001 - Incoming frames          0100 - ICMP
         0002 - Outgoing frames          0200 - TCP
         0004 - AX25 layer 2             0400 - KISS
         0008 - AX25 info frames         0800 - SLIP
         0010 - AX25 layer 3             1000 - PASSALL
         0020 - AX25 layer 4             2000 - Hex Dump
         0040 - IP frames
         0080 - ARP frames
To select protocols, add together the desired hex flags from the above list. For example 0201 will show incoming TCP frames only, while 0241 will show the underlying IP frames as well. The default setting is 03FF, which shows all incoming and outgoing traffic from AX25 layer 2 upwards.
The MMASK command has the same function.
<F5> - Disk capture
The <F5> key toggles disk capture on and off, and is a shortcut for the CAP[TURE] command.
When capture is enabled, anything which is displayed in the central window of an XRPi console is also written to disk. This includes session activity and TRACE'd data. You can make it more specific using <F4> (MMASK) and <F3> (MPORT).
Whereas the screen display is filtered to prevent it being garbled by binary data, the capture is pure binary, so it is useful for diagnostics.
There is a seperate capture file for each XRPi "console", named CAPTURnn.TXT where nn represents the console number (01 to 05). The capture files are created in the XRPi working directory. Although they have the extension ".TXT" to enable them to be easily opened with Notepad, they may somtimes contain characters which Notepad can't display.
Capture is fully independent on each console, and consoles may be captured concurrently. Switching between consoles, or scrolling consoles back, does not affect the capture.
<ESC> - Cancel / Disconnect
The <ESC> key "backtracks" if you have pressed <F1>, <F3> or <F4>. It can also be used to immediately disconnect a console session.
Selecting Consoles
 The left and right "arrow" keys are used to scroll through the various XRPi windows. If you have enabled any consoles, they can be selected using this method.
Note that when you reach the last window, it wraps back to the first and vice versa.
Alternatively you may jump directly to a console by tapping Alt-W followed by the console number, or you may select it from the window menu as shown in the picture on the right. The console numbers are shown on their top status bars.
Command History
Each console remembers the last 5 commands used on that console. These can be selected using the <Ctrl-LeftArrow> and <Ctrl-RightArrow> keys, and actioned by hitting <RETURN>
Review Mode
Scrollback or "review" mode enables you to look at something which went off the top of the screen. Unlike DOS XRouter, XRPi retains the original colours during review mode.
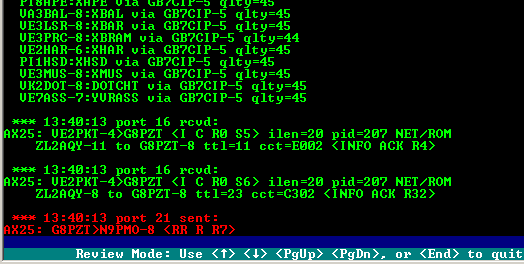
The up and down "arrow" keys control scrollback, along with the <PgUp>, <PgDn> and <End> keys. The only indication of review mode is the caption on the bottom menu bar.
The console won't receive anything else while you are in review mode. However, if you are capturing to file, the capture is not interrupted by review mode.
The default size of the review buffer is 400 lines of text, which is in addition to the current page. Thus if the console height is 50 lines, you can see the last 9 pages of activity. The size of the review buffer can be altered using the REVIEW directive, either (for all consoles) in the global section of XROUTER.CFG, or (for individual consoles) within a CONSOLE definition block.