Documentation Index
Alphabetic Index

XRPi Documentation - Servers
HTTP Server
Name
HTTP-SRV -- HTTP Server.
Description
XRPi's HTTP server delivers HTML files from disk to user, and also provides a means to run certain XRPi commands using a web browser. The following functions are provided:
- HTML file server
- Server Side Includes
- Access to XRPi commands
- URL Rewriting
- Malicious request blocking
- Java applet
- HTTP Proxy
- HTTP Tunnelling
(For details of the proxy / tunnel, please see the manual section for HTTP-PROXY.)
TCP Port
By default, the HTTP server uses the standard HTTP port, which is TCP port 80, and the server can be made available via both XRPi and Linux IP stacks..
The port number, and availability on each stack, may be changed by using the HTTPPORT directive in XROUTER.CFG. Setting the port number to zero disables the server. See the TCP-PORTS manual page for more information.
Server Root Directory
The HTTP server's "root" directory is specified using the HTTPROOT directive in XROUTER.CFG, e.g. "HTTPROOT=/xrpi-htdocs". This allows the HTML files to be located somewhere more convenient, e.g. on a USB hard drive.
If you omit this directive, the default will be a directory called "HTTP" (upper case) within the XRPi working directory.
If the directory doesn't exist, the server will not be able to serve any files, although it will return a simple default page (see below).
For security reasons it is important that you don't use the XRPi working directory as the HTTP root!
Default Page
-
When servicing a request which doesn't include a filename in the URL, (e.g. "http://g8pzt.ath.cx/") the server looks in the HTTP root directory for a file called index.htm (lower case).
If that file is not found, it looks for default.htm. You may therefore use either file as a "landing page" or an index to your site.
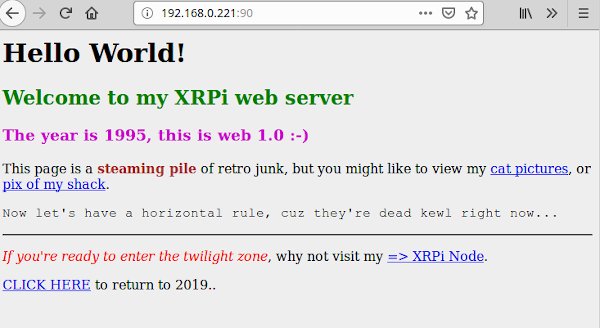
An example index.htm is supplied for your guidance...
This is by no means a perfect web page, just something thrown together as proof of concept. You are encouraged to hack it to suit your own preferences! You may need to alter the address in the "Connect" link to suit your own IP address / hostname. The connect function is normally performed by a Java applet.
The file "index.htm", whatever form it takes, is intended as a default entry point for your XRPi web site.
Although XRPi's primary purpose is a router not a server, and the primary purpose of its HTTP server is to provide a web interface to the node, you may choose to create a complex web site, of which the command interface is but a small part.
Rather than use the supplied example, you may prefer to create your own index.htm as a splash or menu page for your site...
For example, you could include a banner or background image giving a feel for your locality, and put the command interface on one or more linked sub-pages.
Or you may choose the opposite approach, putting all the commands on the main page along with links to other sites. The creativity is left to you...
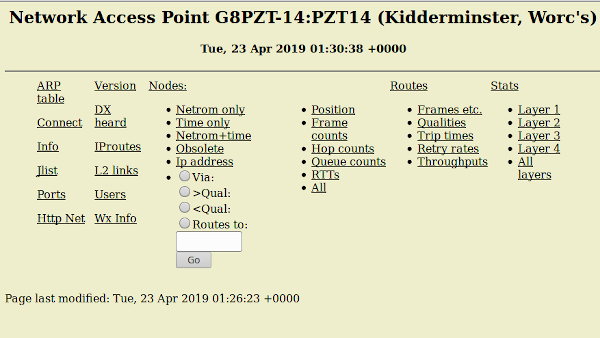
Inbuilt Default Page
If the request doesn't specify a filename (e.g. "http://g8pzt.ath.cx/"), and either the HTTP root directory doesn't exist, or it contains neither index.htm nor default.htm, XRPi serves up a simple default page giving some basic information about the system, similar to the following...
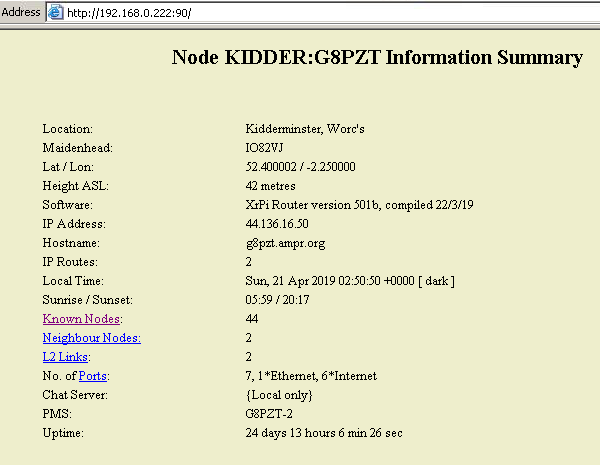
(The page adjusts to the exact configuration and may differ from the above).
This page can also be displayed by requesting "/?info", e.g.
http://g8pzt.ath.cx/?info
Clicking on the "Known nodes" link brings up a page similar to the following one...
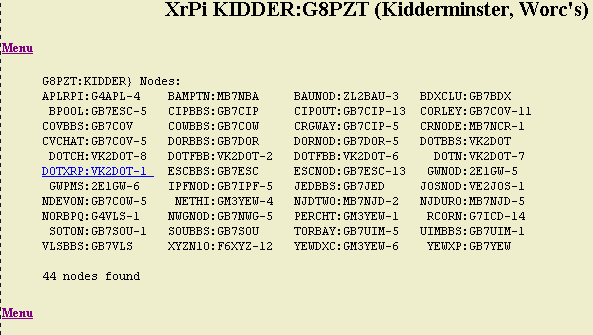
If any node is underlined, as in the case of DOTXRP:VK2DOT-1 above, clicking on that link will take you to the http server of that node.
The same action may be obtained by requesting a URL of the form /node/<nodecall>, where "<nodecall>" is the callsign of the target node. For example:
	http://g8pzt.ath.cx/node/vk2dot-1
	http://g8pzt.ath.cx/node/vk2dot-1/?info
But this only works for XRouter-type nodes (i.e. XRouter/XR32/XRPi/XRLin).
Executing XRPi Commands
When the server receives a request whose URL begins with "/exec?cmd=", e.g. it passes the command to XRPi for execution, and serves a "template" page displaying the response to the command. The template serves as a wrapper for the text.
If the command has arguments, they must be passed as "arg1", "arg2" etc. using the format "&arg1=x", where 'x' represents the argument. There must be no spaces in the URL.
Example: "exec?cmd=n&arg1=h" - executes "N H"
If you wish to override the inbuilt html template, edit the file EXEC.HTM, which was supplied with the installation package, and put it in the XRPi working directory. This file is not placed within the HTTP directory tree because it is not intended to be served in the normal way.
If EXEC.HTM exists, the server will serve it in place of the inbuilt template, replacing the <TEXT> tag with the result of the executed command. EXEC.HTM does not currently support Server Side Includes (see below).
Commands in Forms
Another way of executing XRPi commands is within HTML forms. The form tag's ACTION field should be "exec". Within radio button <INPUT> elements the NAME field should be "cmd" and the VALUE field should be the command plus any arguments, enclosed in quotes. Further arguments can be specified with text input elements, as shown in the following example:
<FORM ACTION="exec"> <INPUT TYPE=radio NAME=cmd VALUE="n v">Via:<BR> <INPUT TYPE=radio NAME=cmd VALUE="n >">&>Qual:<BR> <INPUT TYPE=radio NAME=cmd VALUE="n <">&<Qual:<BR> <INPUT TYPE=radio NAME=cmd VALUE=n>Routes to:<BR> <INPUT TYPE=text SIZE=9 NAME=arg1> <INPUT TYPE=submit VALUE=Go> </FORM>
Server Side Includes
Server Side Includes (SSI) provide another means to generate dynamic HTML. Special tags in the HTML files cause the server to replace the tag with alternative data (such as the contents of another file) when the file is served. Server Side Includes are useful for including a common piece of code throughout a site, such as a page header, a page footer or a navigation menu. If the common code is modified, all pages display the new code. This is preferable to having to modify every page.
SSI has a simple syntax:
<!--#directive parameter=value parameter=value -->
Directives are contained within HTML comments so that if SSI is not enabled, users will not see the SSI directives on the page, unless they look at its source.
Note that the syntax does not allow spaces anywhere between the leading "<" and the directive. The tag must begin with the exact sequence "<!--#" and end with the sequence "-->" otherwise it won't be recognised. Spaces are allowed (and are desirable) between the end of the directive and the "-->".
The SSI directives currently accepted (v501b) are as follows:
	Directive  Parameter  Parameter value
	~~~~~~~~~  ~~~~~~~~~  ~~~~~~~~~~~~~~~
	ECHO       VAR        DATE_LOCAL
	ECHO       VAR        LAST_MODIFIED
	ECHO       VAR        NODE_CALL
	ECHO       VAR        NODE_ALIAS
	ECHO       VAR        NODE_QTH
	EXEC       CMD        {any XRPi cmd string}
	FLASTMOD   FILE       {relative filename}
	FSIZE      FILE       {relative filename
	INCLUDE    FILE       {any file under current dir}
	INCLUDE    VIRTUAL    {any file within http tree}
ECHO displays the contents of a specified HTTP environment variable. Variables include DATE_LOCAL which displays the local date and time, and LAST_MODIFIED which displays the modification date and time of the HTML file that is being served. The remaining variables, i.e. NODE_CALL, NODE_ALIAS and NODE_QTH are non-standard XRPi-specific ones.
Example:
<!--#ECHO VAR=DATE_LOCAL -->
EXEC executes a command. The CMD parameter specifies that the parameter value contains an XRPi command, and the parameter value specifies the command and any argument(s). If the command has arguments, the string should be enclosed in quotes. Not all commands are allowed, only those which are non-interactive and normally available to users. The results of the execution are displayed to the user. If the response contains tables, the whole directive should be enclosed in <PRE></PRE> tags to preserve the formatting. For example:
<PRE><!--#EXEC CMD="r r" --></PRE>
FLASTMOD and FSIZE display the date when the specified document was last modified, or the specified document's size. The FILE or VIRTUAL parameters specify the document to use. The FILE parameter defines the document as relative to the current document path; the VIRTUAL parameter defines the document as relative to the HTTP root.
Example:
<!--#FSIZE FILE=myfile.txt -->
INCLUDE allows the content of one document to be included in another. The file or virtual parameters specify the file (HTML page, text file, script, etc.) to be included. The FILE parameter defines the included file as relative to the current document path; the VIRTUAL parameter defines the included file as relative to the HTTP root.
Example:
<!--#INCLUDE VIRTUAL=/bbs/msglist.txt -->
If the included file also contains Server Side Includes, they will not be actioned.
Some servers will not execute SSI unless the HTML file has a .SHTML, .SHTM or .STM extension. XRPi does not require this.
SSI cannot be used in EXEC.HTM at present.
The file "menu.htm" contains several examples of how to use SSI. You may use it as-is, or modify it to your own requirements.
URL Rewriting
URL rewriting modifies the URL's of incoming requests, according to a set of REWRITE rules in HTTP.SYS. This can be used to organise widely-dispersed resources into a logical directory tree.
The resources may be located on the same PC or even on different servers, but can be made to look as if they are all in the same tree on your server. This is done by replacing parts of the requested URL with alternative strings of characters.
For example, if you only have one public IP address, but you have more than one HTTP server on your LAN which you wish to make visible to the outside world, you could use non-standard port numbers for the additional servers, but that is messy, (e.g. http://g8pzt.atx.cx:8081). People cannot remember the port numbers, let alone be bothered to type them in!
This is where XRPi can help, using URL rewriting plus the HTTP proxy to redirect requests to any number of alternate servers according to the first part of the URL. E.g. a URL which begins with "/bbs" could be redirected to the web server on your BBS.
If the rewritten URL begins with "http://{address}[:port]", where {address} can be either a hostname or IP address, it is treated as a proxy request, and redirected to the appropriate server.
For more information see the manual section on HTTP.SYS.
Malicious Request Blocking
XRPi's HTTP server doesn't suffer from the usual Windows vulnerabilites, so malicious HTTP requests designed to exploit them are a bandwidth-wasting nuisance rather than a real threat. You can frustrate the hackers by deploying the HTTPBAN.SYS file.
This file contains "signatures" or "templates" of typical malicious request URL's. For example a request for "default.ida" is part of a Code Red Worm attack, whilst requests for "cmd.exe" are an attempt to locate vulnerable Windows servers.
You can find out which are the common hacks by examining your daily logfiles, looking for the "HR ... " (HttpRequest) lines. Common ones are "/default.ida" and "/scripts".
The templates are compared in a sliding match with each requested URL. If any part of the first 256 bytes of the URL matches a template, the sender's IP address is entered into a ban list and all further IP datagrams from that host are ignored until XRPi is restarted. Up to 20 hosts can be banned simultaneously.
For more information, see the manual section on HTTPBAN.SYS.
Java Applet
The Java applet XWEB.CLASS can be used to connect to XRPi with a web browser.
The distribution archive contains the applet file, plus 3 rudimentary .HTM pages for you to examine or experiment with.
CONNECT.HTM is the menu page for 3 types of connection, and would typically be accessed via a "connect" link on the main page. You may however wish to put the 3 connect options directly on the main page - it's up to you.
CONN23.HTM uses the Java applet to perform a normal telnet connect to port 23. The port number is configurable (see below), so you could clone the page for use with your chat server.
CONN80.HTM uses the Java applet to perform a "tunnelled" connection, which can be used via corporate firewalls which block normal Telnet.
If you wish to use the above files and the applet, they must be located within the HTTP tree.
You can change the applet colours and font, the number of rows and columns displayed, and the connection mode (normal TELNET, or HTTP tunnel), using <PARAM> tags in the HTML file. For example: <PARAM NAME="font" VALUE="Courier">.
The parameters which can be specified are as follows:
   Param name     Default	Description
   rows           22         	No. of rows in text window
   cols           80        	No. of columns in text window
   bgcolour       Dark grey  	Applet background colour.
   borderColour   Light grey 	Applet framework colour.
   textBackground Black      	Background for text/cmd windows.
   textColour     White      	Colour of sent / rcvd text.
   font           Times      	Font style for sent / rcvd text
   port           9999       	TCP port number for connections.
   mode           Normal     	Connection mode (normal / proxy).
The only mandatory parameter is "port". This should normally be 23 for a normal telnet connect or 80 for an http-tunnelled connect, but you may use other values if you have moved or translated your Telnet or HTTP ports.
Colours should be specified as a 24 bit hexadecimal number in 'C' style, e.g. 0xEECCFF, where the first 2 digits represent the RED value, the second two digits represent the GREEN value and the last two digits represent the BLUE value. Some browsers can only display 216 discrete colours, so you should preferably use the "browser-safe" values, which are all formed from combinations of 00, 33, 66, 99, CC and FF.
The default font is quite small, and the characters are not of a constant width, which means tables sent by XRPi will not line up correctly. You may use the "font" parameter to override the default. The recommended font is "Courier", which is slightly larger and uses constant width characters. Note: if the chosen font is not found on the client's device, their default font will be used, so stick to the common ones.
You may need to reduce the number of rows or columns displayed by the applet if you find it won't fit on a 640*480 screen. It fits nicely on 800*600, but you may wish to optimise it for another screen size, or even offer users the choice.
If you change the font, rows or cols, you may need to tweak the WIDTH and HEIGHT attributes in the APPLET tag to prevent parts of the applet from being obscured.
Configuring XRPi's HTTP Server
If you don't want to use the HTTP server, set HTTPPORT=0.
If you want the server, do the following:
- Decide which TCP port(s) your server will use. The default is 80, but this can be changed using the HTTPPORT directive in XROUTER.CFG. See TCP Port above.
- If you only want the inbuilt default pages, you need do nothing more, other than setting up port-forwarding to your chosen TCP port(s). Otherwise, read on...
- Decide where your HTML files will be located. The default is the HTTP subdirectory of the XRPi working directory. You can change this using the HTTPROOT directive in XROUTER.CFG. See Server Root Directory above.
- Create the directory for your HTML files, and any sub-directories. Remember to give them the appropriate permissions for XRPi to access them! For example, if you create the directories using the root account, but run XRPi as an unpriviliged user, it won't be able to access the files.
- Install an index.htm file in the http root directory. You can use the supplied one as it stands, or modify it, or write your own, or call it default.htm. It is up to you. If you don't install an index.htm or default.htm, XRPi will serve its inbuilt default "info" page, and users will need to know the exact URLs to access any other pages. Once again, remember to give the file the appropriate permissions!
- Install any other html pages that make up your site, ensuring they all have the appropriate permissions. Remember the server is case-sensitive, so your filenames must match the case of any links.
- Modify EXEC.HTM and place it in XRPi's "working directory". You only need to do this if you wish to override the default layout and colour scheme of the HTTP "command interface".
- Test your server by accessing it with a browser via your LAN. You will need to supply the chosen port number if you have changed it from the default, e.g. if you have HTTPPORT=95, then you need to enter "http://192.168.1.20:95/" into the browser's address bar. If all is well, you should see your index.htm page.
- Set up "port-forwarding" in your home router if you want your server to be visible from the World Wide Web. That is outside the scope of this guide.
Limitations
XRPi's HTTP server is rudimentary, because XRPi is a router, not a web server. If you need to serve large numbers of pages, it would be better to use a proper http server.
The number of simultaneous connections on XRPi's TCP/IP stack is limited by the MAXTCP setting in XROUTER.CFG. Historically this always defaulted to 20, because DOS had a maximum of 20 simultaneous open files. There is probably no such limit in Linux, so MAXTCP could be set higher.
The maximum number of simultaneous connections using Linux's TCP/IP stack is hardwired at 50.
The above is important because every page served requires at least one TCP connection. Pages containing graphics require one extra connection for each graphic. RFC793 specifies that the resources associated with a TCP connection should persist for at least twice the Maximum Segment Lifetime (MSL), which some say should be 120 seconds. This value is 30 seconds in XRPi.
So even after the data has been transferred and a connection has been closed, it persists for another 30 seconds. The resources associated with the connection cannot be re-used within that time. Thus with MAXTCP=20, only 20 simple pages can be served in any 30 second interval. If the pages contain one graphic each, only 10 can be served in 30 seconds.
Attempting to request pages at too high a rate will result in a "No resources" response.
These issues will be addressed in a future version.
Files
In XRPi root: EXEC.HTM, HTTP.SYS, HTTPBAN.SYS
In HTTP tree: INDEX.HTM, CONNECT.HTM, CONN23.HTM, CONN80.HTM, XWEB.CLASSSee also
HTTP.ACL(8) -- HTTP Proxy / Tunnel Egress Control File.
HTTP.SYS(8) -- HTTP Rewrite / Proxy Control File.
HTTP-PROXY(9) -- HTTP Proxy / Tunnel
HTTPBAN.SYS(8) -- HTTP URL Blocking File.
TCP-PORTS(9) -- TCP Service Ports.
XROUTER.CFG(8) -- Main Configuration File.