4 Port Controller Administration Guide
This is intended to help those who have built a [4 Port Packet Controller] administer the controller. Under the covers this is just a slightly customized version of Raspbian/Raspberry Pi OS 10.
Contents
Mapping soundcards to controller ports
This should only need to be done when the controller is first built. This should be performed with the case off the controller as it may involve rearranging where soundcards are plugged in.
1) Log in as the "pi" user. 2) Stop all instances of direwolf with the command "stopalldw" 3) Locate port number 1, looking at front of the controller with the USB ports on the left, let to right is port 1, 2, 3 and 4 4) Connect a suitable radio to port 1 DB9 connector. This will need a dummy load or suitable antenna as it will transmit. 5) Place a suitable receiver (other radio, scanner, RTL-SDR, etc) on the same frequency of the radio connected to port 1 6) Start the calibration routine for the first instance with "dw1cal"
The radio should begin to transmit, listen to the receiver for a 1700 Hz tone. If the radio keys up and no tone is audible, look at the bank of soundcards, one of the cards may be flashing or flashing faster than the rest. This is most likely where the port 1 soundcard should be plugged in. Hit CTRL+C and rearrange the soundcards where port 1 is plugged into the USB port that was flashing or flashing faster. Rerun the "dw1cal" routine until the radio keys up and the 1700 Hz tone is heard on the receiver. Once this is complete, repeat steps 4-6, but use the command "dw2cal" for port 2, "dw3cal" for port 3 and "dw4cal" for port 4.
Calibrating Audio Levels
The calibration of audio levels on the controller is key for optimal performance. It is important to not push too much or too little audio on transmit as well as ensure receive levels are not too low or too high. This process can only be performed after the soundcards have been mapped to controller ports.
1) Open up two SSH sessions to the controller, logging in as "pi" on both 2) In the first session, run the command "dwmap" to get a mapping of soundcards to instances. By default:
direwolf1.conf = sc1
direwolf2.conf = sc0
direwolf3.conf = sc2
direwolf4.conf = sc3
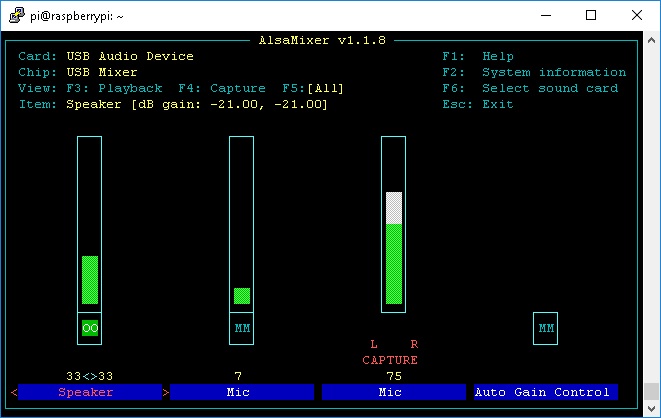
3) We will start with instance 1, start the alsamixer for sc1
alsamixer -c sc1 -V all
This will bring up a menu driven mixer that allows adjustment of Speaker (TX audio) and Mic Capture (RX audio) levels.
The left and right arrows will toggle between Speaker, Mic, Mic Capture and Auto Gain Control. The Speaker and Mic Capture should be present, other cards may look different. The up and down arrows will adjust levels. For transmit, use the left and right arrow to select Speaker.
4) Ideally a deviation meter, service monitor or RTL-SDR following this [Procedure] can be used. Ideally the transmit deviation for 1200 baud should be about 3.0-3.5 KHz.
5) Ensure the radio that will be used on port 1 is attached to port 1. Each radio can be different.
6) In the second SSH session, type "dw1cal", this will cause radio 1 to transmit, monitor output audio with available equipment and use the up/down arrows to adjust the audio drive level. If no suitable deviation measuring method is available, start with the speaker level at 0, slowly pressing the up arrow to increase the drive level. When the drive level is increased and the deviation does not get any louder, stop and back down 1 or 2 levels.
7) In the first SSH session, press CTRL+C to exit the calibration routine. Now we will start up the first direwolf instance with the command "dw1restart". Next we will connect to it's console to monitor receive levels with the "dw1con" command.
8) While monitoring for traffic
Updating direwolf configurations
bar
Starting, Stopping and Restarting Direwolf
baz
Editing bpq32.cfg
qux
Attaching to direwolf console
bux
Attaching to bpq console
qaz
