Calibrating Audio Tones for MFJ TNCs
Properly calibrating audio tones on a TNC can make a huge difference when it comes to efficiency of a packet link. While some TNCs do not need nor allow calibration, the "workhorse" of most packet networks do. The MFJ-1270b, 1270c, 1274 and 1276 radios offer both 1200 and 300 baud operation as well as optional modems to run at 2400, 4800 or 9600 baud. We will only discuss 1200 and 300 baud here, but the same principles should apply to any speed.
Contents
Connecting the TNC to your computer
The procedures outlined here only apply to select few TNCs. With proper documentation of the TNC, these should be applicable to any TNC where you can monitor their audio out. For the MFJ TNC2 clones, there is a 1/8" mono jack in the back of the TNC. This means a simple mono (or stereo) audio jumper cable between the TNC and the Line In or Microphone in will suffice. For others, one could wire up a connector to fit the TNC, sending TXA to the left channel (tip) and ground to the shaft of a standard 1/8" mono plug suitable to plug into a computer soundcard.
The MFJ-1270B and MFJ-1274
The MFJ-1270B and MFJ-1274 are nearly identical on the inside with the exception of the tuning indicator on the front of the MFJ-1274. The tuning procedure for both are identical. To start, open up the TNC, they have 4 screws total holding the cover on. A small phillips screwdriver works nicely. You will want to locate a small standard screwdriver or non-metallic tuning tool to actually adjust the potentiometers which govern audio tone.
Once the cover is removed, with the TNC facing you, you will see 4 sets of potentiometers bundled together in the center, then 2 more off to the left.
In the center you will find
R79 - Receive Audio Level
R78 - Low tone VHF (should be 1200 Hz)
R77 - High tone VHF (should be 2200 Hz)
R76 - Transmit audio
The 2 off to the left are
R106 - Low tone HF (should be 1600 Hz)
R105 - High tone HF (should be 1800 Hz)
The MFJ-1270C and MFJ-1276
Much like their predecessors, the MFJ-1270C and MFJ-1276 are nearly identical as well. The primary difference being that the recieve and transmit level potentiometers are located on the left side of the board with small holes in the cover to allow their adjustment without removing the cover. Similarly to the 1270B/1274, in the center you will find:
R79 - Audio Level in VHF
R78 - Low Tone VHF (should be 1200 Hz)
R77 - High Tone VHF (should be 2200 Hz)
R113 - Audio Level in HF
The two off to the left are
R106 - Low tone HF (should be 1600 Hz, though the manual says 2125 Hz)
R105 - Low tone HF (should be 1800 Hz, though the manual says 2275 Hz)
The discrepancy of tones for HF on the MFJ-1270C/1276 is just to have one standard. In our experience, the 1600/1800Hz mark/space tones are the most common and generally make HF connections easier.
Getting and installing Spectrogram
The software we will be using is claled Spectrogram. Earlier versions are freeware and will work with just about any flavor of Windows. We have only used it on Windows XP, but Windows 98, 2000 will likely work, possibly Vista and 7.
You can download a copy of Spectrogram here[1].
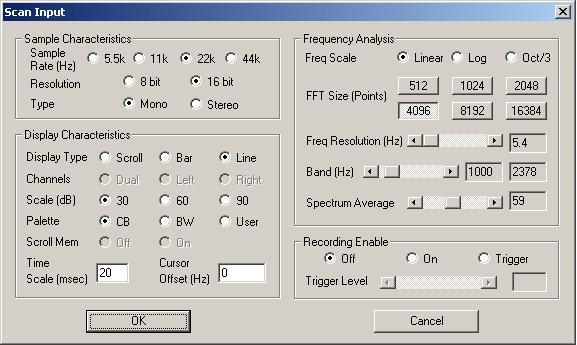
There is no installer for Spectrogram, so just unpack it to it's own folder and click on the "gram" executable. You will be prompted for Scan input settings. For the above purpose, we recommend starting with these:
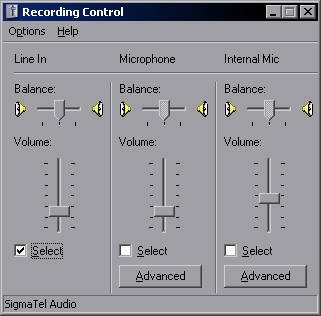
Once set, it is time to connect the TNC to the soundcard. Be sure you select the appropriate source (Line In or Microphone In), line in in this example.
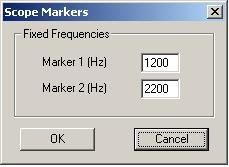
Lastly, set the markers for the target tones. For VHF, this can be set by selecting the Pointers menu at the top and selecting "Freq Mark"
Next, it is time to set the TNC to be calibrated. It is assumed the factory eprom or standard TNC2 eprom are in use. After setting the terminal speed, parity, etc properly, you will be given a cmd: prompt. From here, type "cali"
cmd: cali
The TNC is now in calibration mode. While you have the top open, you may want to place a jumper (or one of the case screws across J4, which is towards the back, to the right of the RS-232 connector. This will disable the hardware timeout timer. This is handy when calibrating tones and deviation, but should be removed for normal operations. Now, type "K", this should send the TNC into transmit mode, with proper input channel selected and cables connected, a small peak should appear across the screen. In this example, this is an MFJ-1274 being tuned.


