Setting Up Winlink RMS Packet and Direwolf: Difference between revisions
No edit summary |
No edit summary |
||
| Line 10: | Line 10: | ||
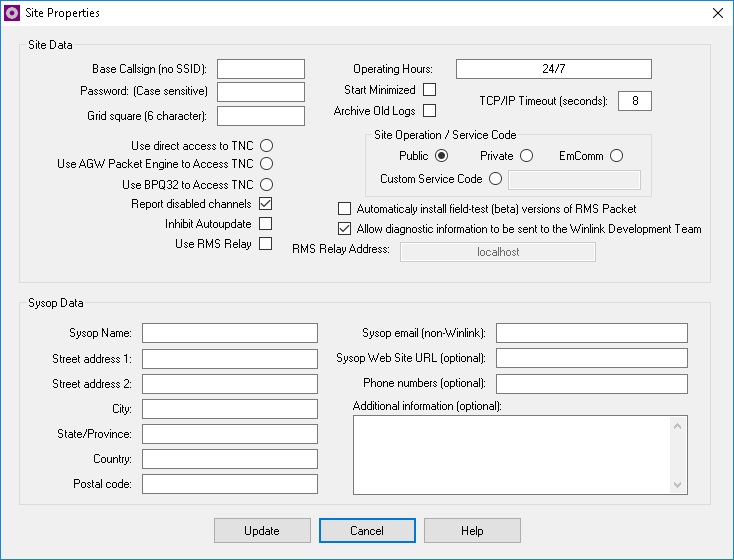
4) Click on RMS Packet.exe, on first run, the "Site Properties" window will appear | 4) Click on RMS Packet.exe, on first run, the "Site Properties" window will appear | ||
[[File:Site_Properties_empty.jpg]] | [[File:Site_Properties_empty.jpg]] | ||
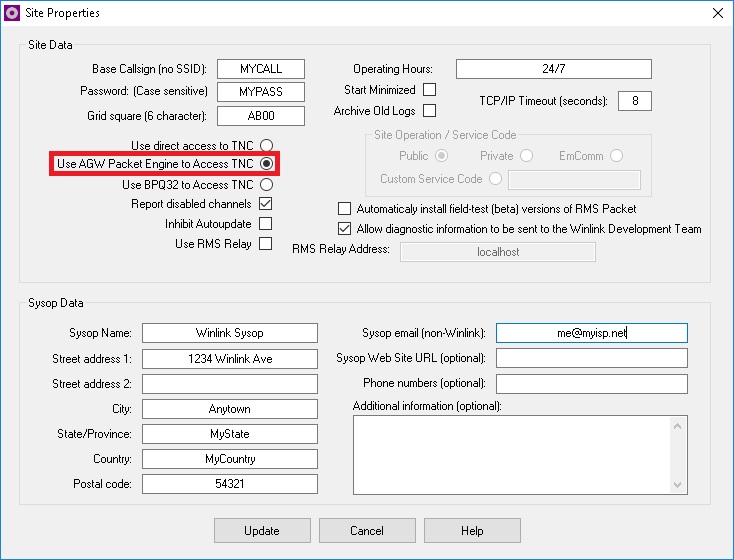
5) Fill in the Site Data (Callsign, Password and Grid Square), select the "Use AGW Packet Engine to Access TNC" [[File:Site_Properties.jpg]] | 5) Fill in the Site Data (Callsign, Password and Grid Square), select the "Use AGW Packet Engine to Access TNC" | ||
[[File:Site_Properties.jpg]] | |||
6) One completed, click Update | 6) One completed, click Update | ||
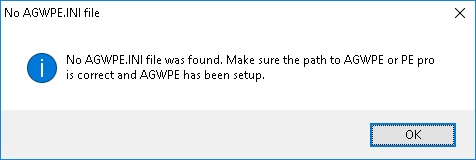
7) An informational Window will appear reporting that the AGWPE.INI file is not found. It appears that RMS Packet is expecting AGWPE Packet Engine Pro to be installed at it's default location of "C:\Program Files\AGWsoft\Packet Engine Pro\" on 32 bit systems or "C:\Program Files (x86)\AGWsoft\Packet Engine Pro\" on 64 bit systems. Click OK to continue. [[File:No_Agwpe-ini.jpg]] | 7) An informational Window will appear reporting that the AGWPE.INI file is not found. It appears that RMS Packet is expecting AGWPE Packet Engine Pro to be installed at it's default location of "C:\Program Files\AGWsoft\Packet Engine Pro\" on 32 bit systems or "C:\Program Files (x86)\AGWsoft\Packet Engine Pro\" on 64 bit systems. Click OK to continue. | ||
[[File:No_Agwpe-ini.jpg]] | |||
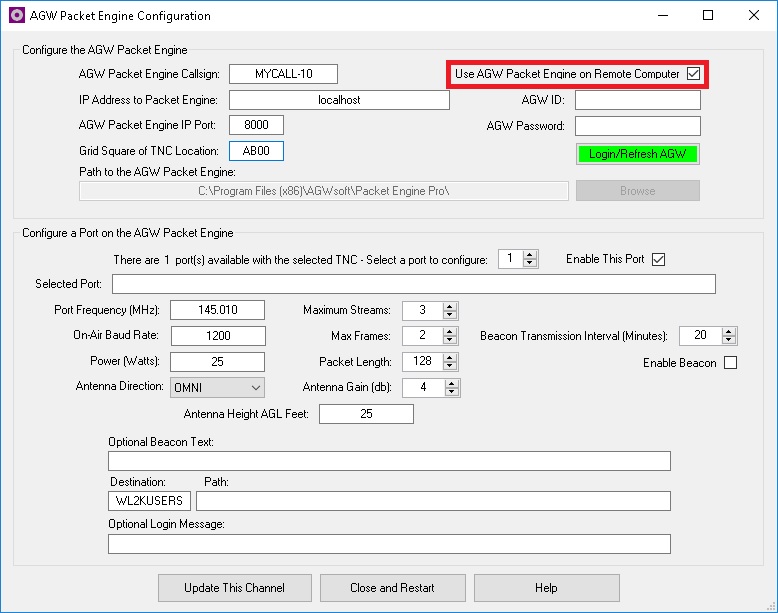
8) We now get the AGW Packet Engine Configuration window, to circumvent RMS Packet from trying to read AGWPE.INI directly, click the checkbox "Use AGW Packet Engine on Remote Computer". Note that this does not necessarily need to be true, but doing this gets us past RMS Packet from trying to locate AGWPE.INI, thus permiting us to use Direwolf. Now is a good time to verify that the AGWPE port number matches your setup, 8000 is the default. Click on "Login/Refresh AGW" and then "Update This Channel" then "Close and Restart". | |||
[[File:AGW_Packet_Engine_Configuration_Remote_Computer.jpg]] | |||
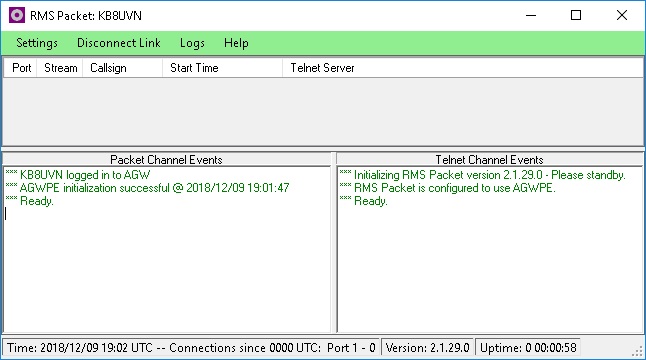
9) At this point RMS Packet should reinitialize and the color behind the menu turn green, in the Packet Channel Events section it sould display "AGWPE initalization successful". [[File:Initialization_success.jpg]] | 9) At this point RMS Packet should reinitialize and the color behind the menu turn green, in the Packet Channel Events section it sould display "AGWPE initalization successful". | ||
[[File:Initialization_success.jpg]] | |||
In addition, you can go to the Direwolf window and verify that it has registered a successful AGW client application: | In addition, you can go to the Direwolf window and verify that it has registered a successful AGW client application: | ||
[[File:Initialization_success.jpg]] | [[File:Initialization_success.jpg]] | ||
Revision as of 14:25, 9 December 2018
This page is to serve as a guide to setting up the Winlink RMS Packet application to interface to the Direwolf soundcard based packet system. This can also be applied to UZ7HO's soundmodem as both support the AGWPE protocol. Be sure to not mix up the AGWPE port number with the KISS over TCP port number as they are not compatible. It is assumed that you have Direwolf (or UZ7HO's soundmodem) up and running, by default the AGWPE interface runs on TCP port 8000, be sure to adjust as needed.
1) Before you can run a Winlink RMS station, you must request authorization to run an RMS station. This process is outlined here: https://www.winlink.org/content/join_gateway_sysop_team_sysop_guidelines
2) Once approved, you will then need to download the current version of Winlink RMS Packet, this is available here: https://downloads.winlink.org/Sysop%20Programs/
3) After RMS Packet is downloaded, unzipped and installed, navigate to the installed folder (C:\RMS\RMS Packet by default)
4) Click on RMS Packet.exe, on first run, the "Site Properties" window will appear
5) Fill in the Site Data (Callsign, Password and Grid Square), select the "Use AGW Packet Engine to Access TNC"
6) One completed, click Update
7) An informational Window will appear reporting that the AGWPE.INI file is not found. It appears that RMS Packet is expecting AGWPE Packet Engine Pro to be installed at it's default location of "C:\Program Files\AGWsoft\Packet Engine Pro\" on 32 bit systems or "C:\Program Files (x86)\AGWsoft\Packet Engine Pro\" on 64 bit systems. Click OK to continue.
8) We now get the AGW Packet Engine Configuration window, to circumvent RMS Packet from trying to read AGWPE.INI directly, click the checkbox "Use AGW Packet Engine on Remote Computer". Note that this does not necessarily need to be true, but doing this gets us past RMS Packet from trying to locate AGWPE.INI, thus permiting us to use Direwolf. Now is a good time to verify that the AGWPE port number matches your setup, 8000 is the default. Click on "Login/Refresh AGW" and then "Update This Channel" then "Close and Restart".
9) At this point RMS Packet should reinitialize and the color behind the menu turn green, in the Packet Channel Events section it sould display "AGWPE initalization successful".
In addition, you can go to the Direwolf window and verify that it has registered a successful AGW client application:
